Managing the Urgent Findings Worklist
The Urgent Findings Worklist displays all studies with an open Urgent Finding based on filterable criteria.
To access the Urgent Findings Worklist from the SynComm Landing Page, the user must have the following Urgent Findings privilege: 'The user can access the Urgent Findings Worklist'.
The ability to create entries, receive findings via other modes of distribution, or view private messages on the worklist depends on the other UF privileges (for more information, see UF User Privileges).
From this worklist, results which have not received a response may be resent by clicking the icon in the U.F. column.

- Refresh Worklist: Forces a refresh of the Urgent Findings Worklist. However, "Administrator"-type users may configure the worklist to auto-refresh by setting the Refresh Time interval (e.g., every minute, every 3 minutes, etc.).
For information about this refresh setting, see UF Worklist Settings.)
- Show Only Private Messages: Filters the Urgent Findings Worklist to display only entries which are marked as Private. Selecting this link toggles the display of the link; the title of the link changes to display 'Show All Messages'. Selecting to show all then releases the Private Message filter on the worklist to display all entries and reverts the link text to display 'Show Only Private Messages'.
Note: This option is only be available for users granted the Urgent Findings privilege 'Can See UF Private Messages'.
- Show Closed Findings: Filters the Urgent Findings Worklist to display only entries which have been closed. Selecting this link toggles the display of the link; the title of the link changes to display 'Hide Closed Findings'. Selecting to hide closed findings then releases the Closed Findings filter on the worklist to display all open entries and reverts the link text to display 'Show Closed Findings'.
Note: Select the Filter button to engage the Filter selection window. After selections have been made, click anywhere on the page outside of the Filters to close the Filter selection window. Filter changes are displayed after the Apply button has been selected.
- Sites: A list of sites available for the logged in user. The sites available to a user are managed by privileged users. (For information about configuring Worklist Sites, see User Privileges.) Users can select individual sites or all available sites.
- Findings: A list of available Finding types. Users can select individual types or all available types.
- Created By: A list of users who have created findings. Users can select individual types or all available users.
After Filter options have been selected, use one of the following:
- Apply: Updates the worklist to apply the current filter selections.
- Clear Filters and Show All Records: Resets all filter options and shows all available records.
- Save Filters: Saves the current filter settings to the user's login. The saved filter settings become the user's default settings for the worklist. Whether the user navigates to a different page within the system or logs out, the next time the user accesses the worklist the saved filter settings are retained.
If the Urgent Finding Worklist has been configured to display visual alerts for approaching and exceeded Response Types, the U.F. column displays the following icons for each alert:
-
 : Default icon to access the Urgent Finding window
 -
 : Displays if the Urgent Finding has not been responded to and the system is configured to display an alert that the required follow up time is approaching. When this icon is displayed, the entire row for the entry is also highlighted in gold by default.
 -
 : Displays if the Urgent Finding has not been responded to and the system is configured to display an alert that the required follow up time has been reached/exceeded. When this icon is displayed, the entire row for the entry is also highlighted in red by default.
 -
 : Displays if the Urgent Finding has been marked Private. Only privileged users may view private messages within the Urgent Findings Worklist and Pulse.
For more information about configuring UF Worklist visual alerts, see UF Response Types.
Actions available from the Urgent Findings Worklist
Select the  icon to launch images from the Urgent Findings Worklist. The images are launched into the native Synapse PACS viewer.
Select the hyperlink in the Proc Description column to open the Report![]()
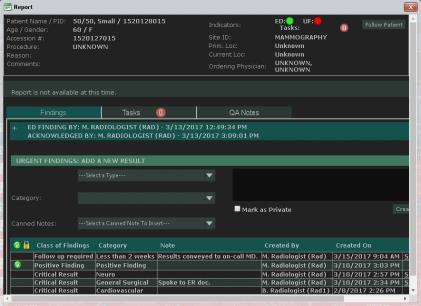 window.
Select the  icon in the Follow column. When a patient is currently being followed by the logged in user, a checkmark icon
  is displayed in the Follow column.
The user must have the following privileges:
- The user can create a new Urgent Finding
- The user can access the Urgent Findings Worklist
- Locate the finding and click the icon in the U.F. column.

- Select a Type and Category.
- Select a canned note, which can be modified, or type the note if needed (maximum 255 characters).
- Select the Mark as Private option if the entry is to be visible only to users who have the specific privilege to view Private messages, which is managed by privileged users (for information about configuring privileges, see UF User Privileges).
- Click Create or Create and Send.
The user must have the following privileges:
- The user can create a new Urgent Finding
- The user can access the Urgent Findings Worklist
- Locate the finding and click the icon in the U.F. column.
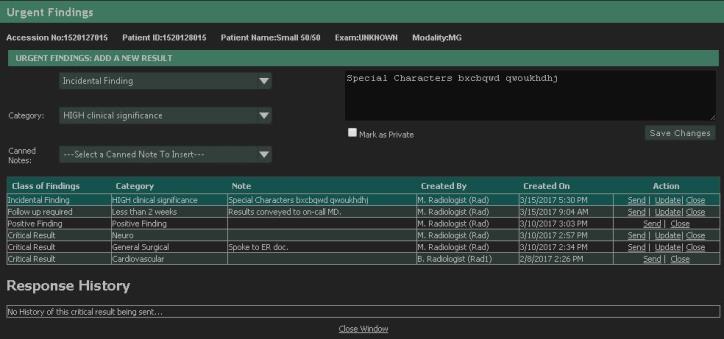
- Click the Update link in the Action column for the entry.
- Modify the options as needed.
- Click Save Changes.
The user must have the following privileges:
- The user can access the Urgent Findings Worklist
- Locate the finding and click the icon in the U.F. column.
- Click the Send link in the Action column for the entry.

- Enter the individuals to receive this entry.
- Click Send Result.
The user must have the following privileges:
- The user can access the Urgent Findings Worklist
- Locate the finding and click the icon in the U.F. column.
- Click the Close link in the Action column for the entry.
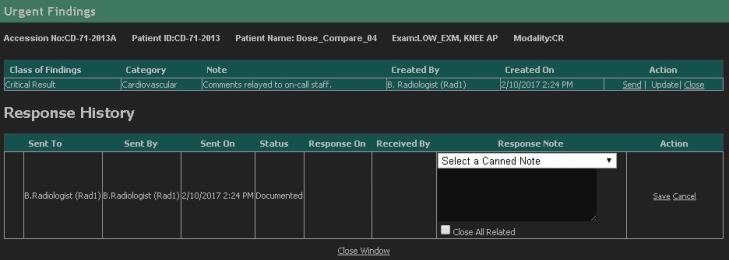
- Select a canned note option and type additional note if needed.
- Select Close All Related option if desired.
This option closes all open entries for the selected Urgent Finding. If the user selects this option, their name, date/time, and notes are stored to all of the entries.
- Click Save.